|
SGT Rock's Pocket Pad
My wife recently started getting into backpacking and hammocks. So far she has
been on 4 trips. Each one we have gone a different route:
1 - She tried an Army sleeping pad (23" wide and stiff) with a No Sniveler
underquilt for the bottom and a Nunatack BCB for the top. Results: Warm on top
and bottom - but the pad was too stiff for her.
2 - A softer Zlite pad (20" wide) for the bottom and Nunatak BCB for the top.
Results: Warm on top, bottom OK, but the pad wasn't wide enough or thick enough
and it slipped around too much.
3 - The next trip we tried her without any pad and just a No-Sniveler under her
and the Nunatak BCB on top. Results: she got cold again.
4 - A "T" style pad idea similar to a segmented pad extender. This time she used
the ZLite pad with a Wal-Mart eggcrate pattern attached to the bottom to create
wings and make the pad thicker under her back and butt. We also put a new
No-Sniveler under her hammock and she used the Nunatak BCB on top. Results: She
was warm and liked the way the wing pad stayed under her, but the part under her
legs and feet was sliding around and the weight for both pads was getting up
there.
So now we get to the next stage of her sleeping system. She has decided she
wants a pad like my Oware mummy pad I made a few years back. It is 1/2" thick
and warm, doesn't slide, and weighs very little. She tried it on a test hang in
the yard and got hot with just the pad. No problem - we order the material and
plan to make it for her.
Now here is one kink in her system. Her pack is a SixMoon Designs pack that uses
the ZLite for a pack frame - so she is still going to end up carrying a pad that
can only be used for that. That seemed like a shame to have to carry one (even
if you cut it down) that wouldn't do her any good for anything besides sitting
on and a pack frame. So my brain started spinning - what if there was a way.
Then it came to me...
A pocket pad.
Check this out:
We didn't get thes from Oware, these are from Gossamer Gear: but they are the
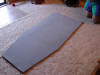
same pads and cost about $25 each. They are 60"x40" (give or take). So we cut
them down to 28" wide.

Then I mark down the side 36" (mine is less, but she wanted it wider near the
hips than mine)
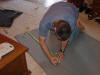
And make a second set of marks so the foot end is only 18" wide. Cut those
little wings off.
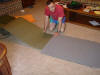
Now once the first pad is done, you can line it up on the second pad and outline
it for cutting:

Then cut the second pad so they match up:
Next, I tried to figure about how much space I would need for extra pads inside:
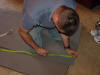
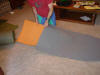
Using Gorilla Glue, I made about a 1" wide strip around the sides.

Next I put the other pad on and used weights and wood to hold the sides together
as the glue set (note that this picture was as I was setting these things on
there, it took more than is shown here):

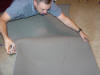
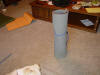
When the pad is done setting, there is a little excess glue that needs trimmed
away on the edges, but it comes out looking like on pad that is 1/2" thick:
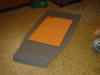
Now I have the pad complete. BUT she also has an option to add insulation
between the layers. For instance she could add her Z-Line pad:
Or if someone else wanted this sort of pad and wanted to use their old trusty
Thermarest in a hammock and avoid slipping or the problem with narrow inflatable
pads:

You could slide your Thermarest in and leave a little on top for a pillow:

Or if you wanted to go with cheap, wide pads it looks like you can go up to
about 24" wide with other pads inside it
And finally, it rolls up to a nice little package at 11.13 (315 grams) ounces:
You can probably go lighter on it by changing how long the sides stay at 28"
wide.
After watching a few people go through various ideas to try and make pads work -
I think this is a good solution that can help a lot of people get some extra
service from their old pads in a hammock.
|


